A Shower Seal Nightmare on Park Street,
Thanks to one of our contributors we have an excellent article detailing the damage done from a leaking shower tray. The fault lies solely with the installer and their lack of adhering to best practice when installing a shower tray. We will also follow up with an article on the solution of how best to seal between the shower tray/bath and tiles.
Part 1 focuses on the problem and damage caused, Part 2 will be a comprehensive write-up on the fix, i.e. the tanking and fitting a Sealux Shower Seal.
Part 1 Locating the leak from the Shower Tray
The shower tray was countersunk into the floor for easy access. There was no specific shower seal or edging trim used apart from a bead of silicone around between the tiles and the shower tray ledge. Apart from a damp smell in the bathroom what really caught our attention was the staining on the kitchen ceiling that appeared literally over a weekend. Fig.1 shows the water stain on ceiling from leaking shower tray located in the bathroom above. Apart from being an ugly eyesore our main concern was proximity to electrical wiring and damage to the timber flooring and joists. We have since realised that this stain must be treated properly with a proper primer, but that's another days work.

One major problem with this bathroom is where the builder/plumber choose to locate the shower head in relation to the window sill, see Fig. 2. The shower curtain does not cover the three sides i.e. from the corner to the wall where the sink is mounted. This means that water from the shower head will be sprayed onto the window sill and settle there. As the grout used in this bathroom was not a waterproof one and is considered 'porous' this will allow water to seep through and penetrate the underling plaster and timber. Tip, ensure on using a high quality waterproof grout for your bathroom.
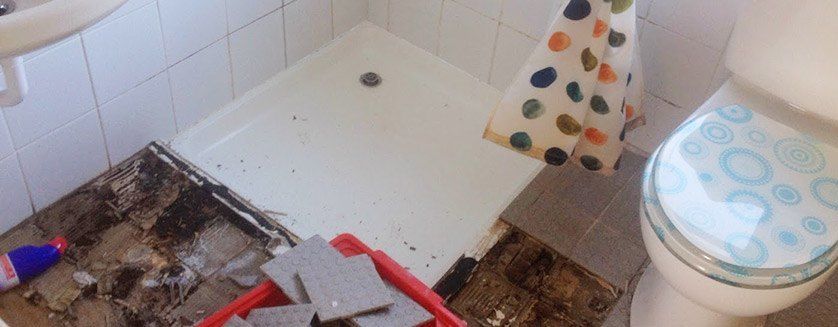
Our initial step was to remove the tiles at the perimeter of the tray. These were easily prized off as the adhesive was soft and was breaking up. Fig. 3.shows the damp plywood that is heavily water damaged. On further investigation this ply was not WPB marine plywood. This ply was so damp that you could literally break it up with your bare hands!!! The water had propagated under the tiles to areas over a foot away from the edge of the shower tray. This can be seen in Fig. 4.

With further removal of floor tiles we noticed that the plastic protective skin that the shower tray was wrapped in had not been removed when installed. The term 'cowboy builders' is now flashing across my eyes as my blood pressure rose to an all time personal record. What is clear is that this is now becoming a major project and a simple tube of silicone was not going to fix anything.

Conclusion:
Rip the shower tray out, remove all floor tiles, inspect damage to floor and supporting joists. Decide a new location of where shower head will be placed as screening off the only window in the bathroom makes no sense. Do research, research and more research with the aim to get the best sealing solution for this bathroom. Get a proper professional plumber to install shower and do the waterproofing oneself.