A Shower Seal Nightmare on Park Street, Cont.
Following on from our previous post we will look at the waterproofing/tanking of the shower walls and the subsequent sealing between the Shower Tray/bath and wall tiles.
First things first, You will recall the previous layout included a showertray that was countersunk into the flooring but the shower head was directed towards the window ledge. We decided that we were going to remove the shower tray and replace it with a bath. A new shower would be installed over bath but this time the head would be located on the correct wall.We also decided that all wall and floor tiles would be removed. All walls had Aquaboard fitted where there was old bare blocks (that had T&G paneling)
Fig. 6 shows a panoramic of the bathroom and where we intend to locate the shower and bath.

We have seen what happens when a shower tray is allowed to leak and the damage it does to the timber floors. Once the floor and walls (See. Fig.7) were repaired we installed a standard sized bath and got out plumber in to plum the new water feed to the electric shower. With the bath installed and the second fix plumbing done for shower we set about getting our hands on a BAL Tanking Kit and a Sealux Reg 20 shower seal kit.
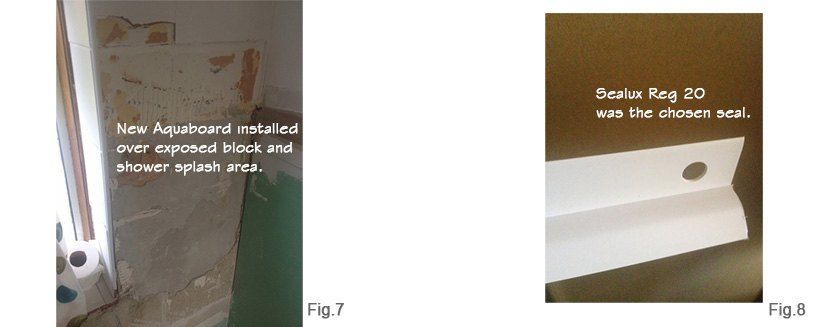
We opted for the Sealux Reg 20 kit (See. Fig.8) as this size would fit perfectly behind the washers that mount the taps to the Bath. Sealux 25 would have been too wide to fit behind the taps, this only applies to bath rather than shower trays. As this job including the tiling it was decided to go with the Sealux 'Reg' (Regular) version over the Trade 'Pro' version. The lengths were measured and then measured again, mitre cuts were done with a 45 bench saw, this gives perfectly accurate mitre cuts.

Handy Tip:
Do a dry fit to ensure all measurements for the Sealux are spot-on before applying the Sealux-N silicone. This can be seen in Fig. 9. It is important to follow the instructions as per brochure. A quick wipe down with the alcohol wipes to ensure the bath was free from and dust or grease will ensure the best possible bond of Sealux-N silcione. The Sealux Reg 20 trim was inverted and the cavity was flush filled with Sealux-N silicone, with a good bead of silicone applied along the aquaboard and bath ledge the Sealux trim was fitted and left alone to cure, see Fig. 10.

With the Sealux trim installed we can no go about the tanking.Tanking is very important waterproofing practice and the good news is that it is easily done. We following the instructions set out in the BAL Tanking Video. Apply the APD primer to the walls followed by the first coat of WP1. Without repeating the instructions as described in the BAL video
Handy Tip: Cut the polyester tape for the vertical corners and horizontal lengths (that will go over the upstand piece of the Sealux shower seal before you start applying the WP1.
Paint over this tape and continue to cover wall (typically the splash area from shower). Do the first coat in a vertical application with the paintbrush. When applying the second coat of WP1 complete it in a horizontal manner. This gives a perfect coat of the wp1 membrane.
Once completed all that was needed was to begin tiling, more on that coming in Part 3.